How to bypass firewalls by hiding all traffic in HTTPS(SSL)443 encapsulated traffic
[Overview]⌗
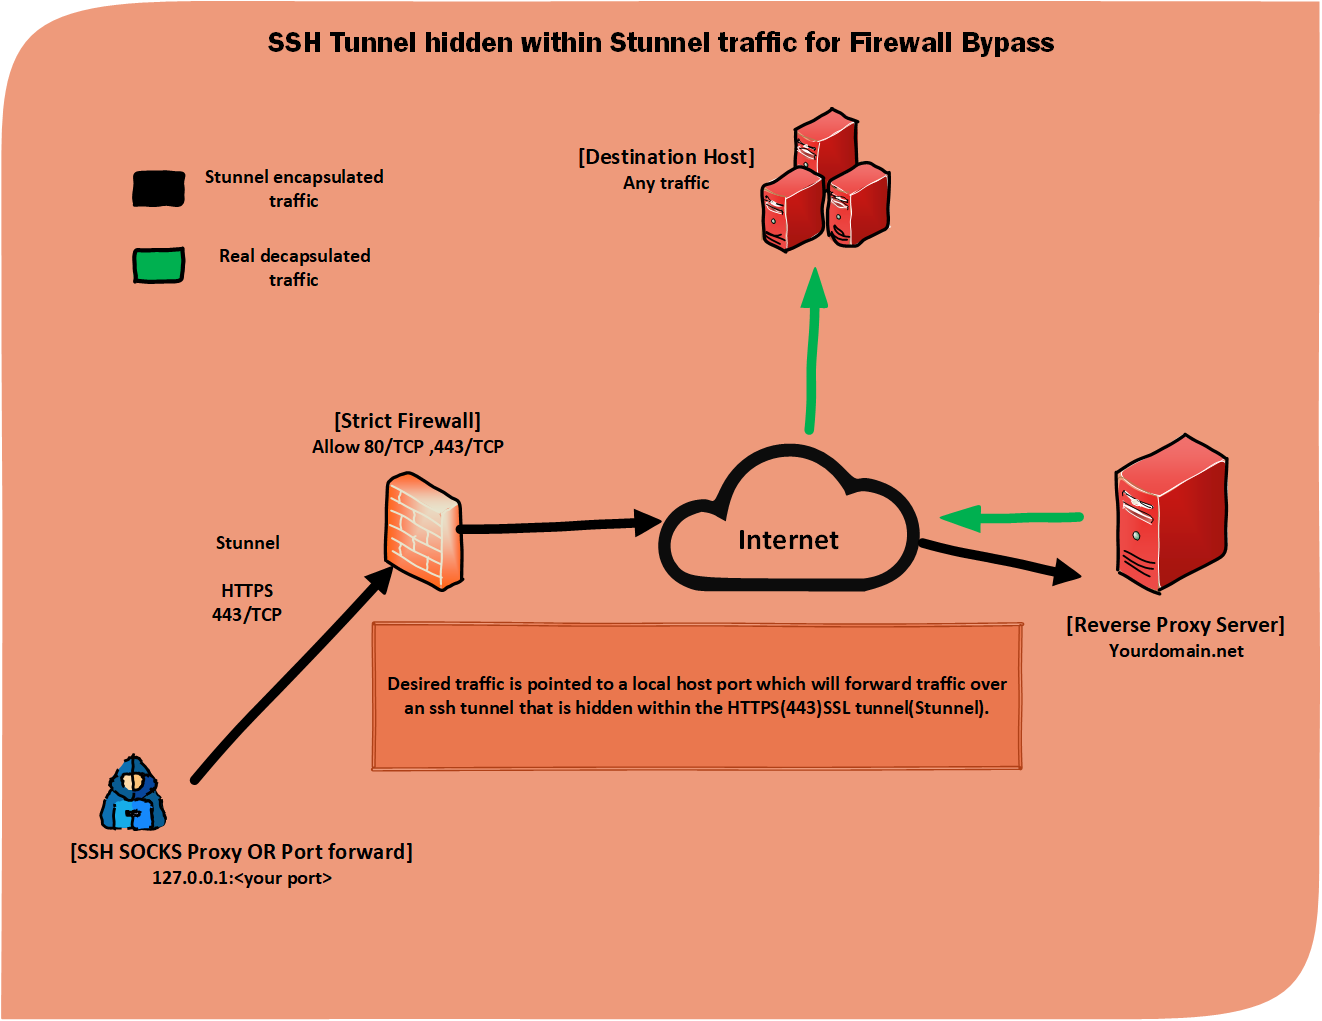
Usually when behind a public or locked down firewall majority of the egress(outbound) traffic allowed is port 80(http) and 443(https). This is to allow only web surfing and prevent other applications and services like email or gaming to be used. The outbound web traffic can also be restriced by content filtering allowing what type of websites that can be accesed. Another large concern is privacy. When using public networks or even using your own ISP’s network all of your traffic is visible to them.
With this reverse proxy setup we can mask all of our traffic to appear as essentially HTTPS traffic which allows us to bypass alot of these restrictions. This can also be used as an alternative to vpns or used in conjuction with vpn to further mask traffic and provide more privacy. This method will work in most situations. Sometimes SSL inspection is configured or advanced content filtering and/or threat intelligence is being leveraged increasing factors of traffic getting blocked. However, these scenarios usually only occur in mature corporate enviroments and not the average public networks.
To do:
We will host a reverse proxy on the internet. With a tool called stunnel we can create an ecrypted port forwarding tunnel over a 443(HTTPS) connection. Then we will use that port forward to create a ssh tunnel hidden within the encrypted 443(ssl) traffic that will allow us to setup a nested socks proxy OR portforward which in turn allows us to send any traffic we want out of the network.
Lets get started!
[Requirements]⌗
For this deployment I will be using an Ubuntu 23.04 VPS(Virtual Private Server) for the reverse proxy server and Kali 6.3.0 for the client machine. This setup does not require these operating systems specifically. If you decide to use different operating systems just make sure the tools are compatible.
Reverse Proxy Server:
- LetsEncrypt(Free SSL cert service)
- Purchased domain to create valid ssl cert(Can be cheap domain i.e $1.99/year)
Tools/Services
Client Machine:
Tools
[Setup]⌗
Reverse Proxy Server⌗
The server will take the most effort to setup. With this being a fresh Ubuntu install we will update and upgrade the server.
sudo apt update && sudo apt upgrade -y
Now we need to install the apache2 service and then run certbot to receive our LetsEncrypt SSL cert. This allows us to receive a signed ssl cert related to our domain for the reverse proxy server.
Install Apache2
sudo apt update
sudo apt install apache2
Considering the server is running services and is reachable from the internet we will create host based firewall rules.
Create host based firewall rules
sudo ufw allow 22/tcp
sudo ufw allow 80/tcp
sudo ufw allow 443/tcp
Feel free to add any further firewall rules that are necessary for any other services you decide to run. Now that the rules are created we need to actually enable them.
Enable firewall rules
sudo ufw reload
Enable Apache2 service
sudo systemctl start apache2
Now, as explained on the certbot website, we will use the apache2 service to request our signed SSL cert for the purchased domain. If you don’t own one already this is the time to buy a domain before proceeding.
The domain we purchase is important because this is where all of our tunneled traffic will be seen going to when passing through the network and firewall. Choose a generic or innocent domain name with a common top level domain like .com, .net, .io etc. (Firewalls with threat intelligence are known to block cheap or uncommon domains like .xyz)
If you are not familiar with how to purchase a domain through a registrar take the time out to research and get familiar with the process. It’s pretty simple and domains can be purchase from a registrar like this one.
The registrar usually provide dns services which you will use for the domain you purchased. Once you have a DNS A record created and it’s pointing to your reverse proxy server you are ready to receive your ssl cert using certbot.
Certbot is a script that automates the SSL cert creation with LetsEncrypt. To see specific instructions, which may vary depending on your reverse proxy server’s operating system, visit here
Install Certbot
sudo snap install --classic certbot
sudo ln -s /snap/bin/certbot /usr/bin/certbot
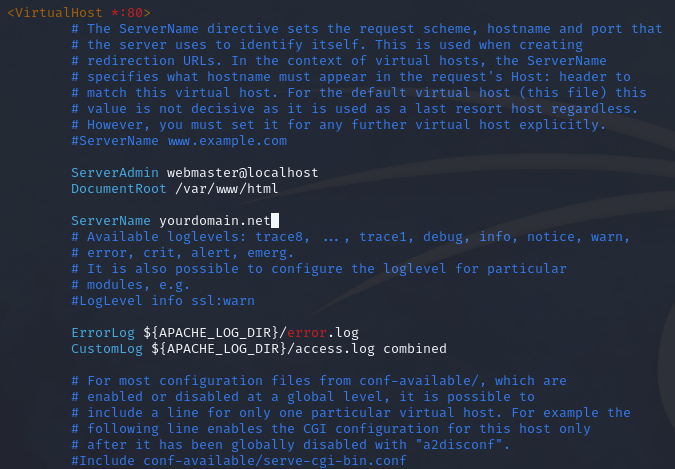
Before running cerbot we will edit the /etc/apache2/sites-available/000-default.conf configuration file so that the cerbot script can identify our server by its purchased domain name.
Edit Apache2 configuration file
sudo vim /etc/apache2/sites-available/000-default.conf
Add the following line to the configuration file
ServerName yourdomain.net
Now its time to receive our SSL cert and begin the stunnel setup.
Run certbot
sudo snap install --classic certbot
Once this runs succesfully you should see the output of where your new SSL certificate and private key is located.
cert = /etc/letsencrypt/live/yourdomain.net/fullchain.pem

key = /etc/letsencrypt/live/yourdomain.net/privkey.pem
We no longer need the apache2 service now that we have used certbot to obtain our valid ssl cert. The service must be stopped so that the listening port 443 can be used later by stunnel.
Stop Apache2 service
sudo systemctl stop apache2
Stunnel can now be setup. Lets install it on the reverse proxy server.
Install Stunnel
sudo apt update
sudo apt install stunnel4
Create/Edit the stunnel config file on the server to use our new ssl cert. We will define its listening port and forwarding instructions.
sudo vim /etc/stunnel/stunnel.conf
Add the following lines to the config file
pid = /var/run/stunnel.pid

cert = /etc/letsencrypt/live/yourdomain.net/fullchain.pem

key = /etc/letsencrypt/live/yourdomain.net/privkey.pem

[ssh]

accept = 0.0.0.0:443

connect = localhost:22

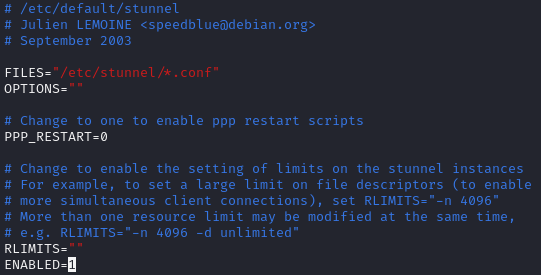
Edit additional stunnel config file to enable the service
sudo vim /etc/default/stunnel4
Add the following line to the end of the config file
ENABLED=1
Start the stunnel service
sudo /etc/init.d/stunnel4 restart
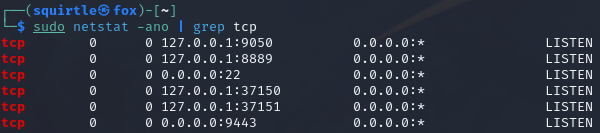
To ensure the stunnel service is running and listening on specified port 443 run the following command
sudo netstat -ano | grep tcp

If you see that your reverse proxy server is listening on port 443 after starting the stunnel service you are all set! Now lets pivot over to the client machine and setup the stunnel client and begin bypassing.
Client Machine⌗
Update and upgrade the fresh kali install on the client machine.
sudo apt update && sudo apt upgrade -y
Now that our client machine is updated and ready to go we need to install stunnel.
Install Stunnel
sudo apt install stunnel4
Create config file for stunnel client. This can be created anywhere but I will create mine in the $HOME directory
Create config file
vim $HOME/stunnel-client.conf
Add the following lines to the config file
pid = /tmp/stunnel.pid

client=yes

[ssh]

accept=9443

connect=yourdomain.net:443

Run stunnel client to connect to reverse proxy server establishing ssl(443) tunnel
sudo stunnel $HOME/stunnel-client.conf
Now confirm if the client is listening on its forwarding port that is defined in the config file
sudo netstat -ano | grep tcp
[Bypassing]⌗
The reverse proxy server is fully setup and configured. We can succesfully connect from our client machine using stunnel to create the ssl(443) tunnel. Now we will setup our SSH port forward or socks proxy that will be hidden within our ssl(443) tunnel.
SSH Socks 4/5 Proxy⌗
This SSH tunnel will open a socks proxy on the client machine that will forward any traffic sent to it over the ssh tunnel that is hidden inside the ssl(443) tunnel
Create the ssh sock proxy tunnel
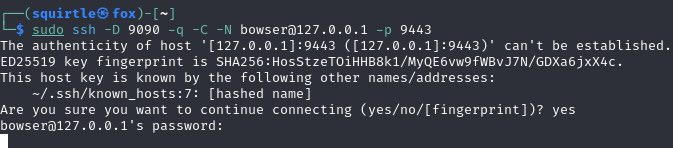
sudo ssh -D 9090 -q -C -N <user>@127.0.0.1 -p 9443
-D : specifies the listening port of the socks proxy on the client

-q : runs quiet mode where no output is displayed locally

-C : compress data in the tunnel to save bandwidth

-N : non interactive ssh session just creats the tunnel no command prompt

-p : defines the destination port to connect to (We are conencting to port forward provided by stunnel client)
SSH Port forward⌗
This SSH tunnel will create a listening port on the client machine to port forward traffic over the ssh tunnel that is hidden inside the ssl(443) tunnel
Create the ssh port forwarding tunnel
sudo ssh -q -C -N -L 9090:<destination ip>:<destination port> <user>@127.0.0.1 -p 9443
-L : specifies the listening port of the port forward on the client

-q : runs quiet mode where no output is displayed locally

-C : compress data in the tunnel to save bandwidth

-N : non interactive ssh session just creats the tunnel no command prompt

-p : defines the destination port to connect to (We are conencting to port forward provided by stunnel client)

[Conclusion]⌗
With this reverse proxy server setup and technique we can make all OR specific traffic appear as HTTPS(443). Once the client establishes its SSL tunnel to the reverse proxy server the firewall is unable to tell the difference between our ssl tunnel and normal HTTPS(443) traffic due to encryption. In general public networks this is enough to bypass the firewall restrictions. This also works as a VPN alternative on networks where VPN traffic is blocked. Remember only TCP traffic can traverse ssh socks proxy or port forwarding.
When dealing with advanced firewalls there are many additional factors that can determine if the ssl connection is allowed over port 443. More advanced firewalls not only can perform SSL inspection(Decryption) but can also make decisions to allow traffic based off of destination ip address geo location, ssl cert attributes, domain categorization, and domain reputation. This is where picking a domain with a common TLD(top level domain) and a generally trusted country to host the reverse proxy server is crucial.
If you are an OSINT savy Cybernaut; registering an expired domain that already has url catergorization and good reputation would be recommended.
If you have purchased a brand new domain there are ways to get it categorized and build a domain reputation. These will not be covered here but will be touched on in another blog. If you made it this far I hope this was helpful and I’m sure you may come up with some creative use cases for this setup.
Enjoy.

-Isaiah Miller (Cybernaut #001)